Building an RTSP Tunnel for a Linux IP Camera
This guide will provide general instructions for cross compiling the Nabto Edge TCP tunnel embedded application and installing into a typical Linux based IP camera as an RTSP tunnel. After completion of the guide, you can stream video securely from an RTSP server on the camera. Note that setting up the RTSP server itself is not subject of this guide, only the RTSP tunnel.

Using an RTSP tunnel for video streaming is one of the most popular Nabto Edge use cases. Read more about this and the pros and cons in our general video streaming intro.
Prerequisites
You need all of the following to complete this RTSP tunnel guide.
Toolchain
A toolchain (compiler, linker etc.) is needed to cross compile the Nabto Edge Embedded SDK and tunnel application for the camera hardware. Typically a GCC suite is supplied by the chipset vendor.
CMake
The CMake build tool is needed to cross compile the Nabto Edge Embedded SDK and the tunnel application. It is available through most package managers (sudo apt install cmake or brew install cmake). Or it can be downloaded and installed manually.
Developer access to camera
It must be possible to somehow login to the camera, e.g. using telnet, ssh or a serial line. It must also be possible to transfer files to the camera, e.g. through ftp or with an http client on the camera (e.g., wget or curl).
Working RTSP server must be running on camera
Verify that an RTSP server is running on the camera by showing the stream directly (without Nabto) from a local client using e.g. VLC or FFmpeg. For instance, install FFmpeg and view stream using ffplay:
$ sudo apt update
$ sudo apt install ffmpeg
$ ffplay  -rtsp_flags prefer_tcp rtsp://192.168.0.87:554/live
Replace 192.168.0.87 with the local IP address of your camera and 554 with the RTSP server’s port if different. Replace /live with the specific RTSP path of your feed.
When you can see a working live feed, note the port and path as it is needed later when setting up remote access through Nabto Edge.
Loopback interface must be up
If you run the ifconfig command on the camera, it must show the loopback interface (lo) associated with IP address 127.0.0.1:
$ ifconfig
lo     Link encap:Local Loopback
     inet addr:127.0.0.1 Mask:255.0.0.0
     UP LOOPBACK RUNNING MTU:16436 Metric:1
     RX packets:0 errors:0 dropped:0 overruns:0 frame:0
     TX packets:0 errors:0 dropped:0 overruns:0 carrier:0
     collisions:0 txqueuelen:0
     RX bytes:0 (0.0 B) TX bytes:0 (0.0 B)

wlan0  Link encap:Ethernet HWaddr FE:DE:AB:E0:87:42
     inet addr:192.168.0.87 Bcast:0.0.0.0 Mask:255.255.255.0
     UP BROADCAST RUNNING MULTICAST MTU:1500 Metric:1
     RX packets:83 errors:0 dropped:64 overruns:0 frame:0
     TX packets:6 errors:0 dropped:0 overruns:0 carrier:0
     collisions:0 txqueuelen:1000
     RX bytes:11754 (11.4 KiB) TX bytes:1616 (1.5 KiB)
If you do not see the lo interface, you must bring up the interface, it can typically be done with something along the lines of:
$ ifconfig lo 127.0.0.1 up
But further steps might be needed. Also, you must research how to add it permanently in your specific configuration, ie so it is available after a camera reboot.
Compile the Nabto Edge tunnel binary
Source code can be obtained from github. It is recommended to download the latest release source bundle (nabto-embedded-sdk.zip ) instead of cloning master.
Unpack the zip file and prepare a build directory:
$ unzip nabto-embedded-sdk.zip
...
  inflating: nabto-embedded-sdk/src/core/nc_stream_manager.h
  inflating: nabto-embedded-sdk/src/core/nc_coap_client.c
  inflating: nabto-embedded-sdk/src/core/nc_keep_alive.c
  inflating: nabto-embedded-sdk/src/core/nc_version.c
   creating: nabto-embedded-sdk/.vscode/
  inflating: nabto-embedded-sdk/.vscode/settings.json
$ mkdir build
$ cd build
Enable CMake to find your cross-compiler by setting the CC environment variable. Then run CMake, specifying the root directory of the unpacked source code bundle as the single parameter:
$ export CC=~/mips/mips-gcc540-glibc222-64bit-r3.3.0/bin/mips-linux-gnu-gcc
$ cmake ../nabto-embedded-sdk
-- The C compiler identification is GNU 5.4.0
-- The CXX compiler identification is GNU 5.4.0
-- Detecting C compiler ABI info
-- Detecting C compiler ABI info - done
-- Check for working C compiler: /home/ubuntu/mips/mips-gcc540-glibc222-64bit-r3.3.0/bin/mips-linux-gnu-gcc - skipped
-- Detecting C compile features
-- Detecting C compile features - done
...
-- CMAKE_C_COMPILER:         /home/ubuntu/mips/mips-gcc540-glibc222-64bit-r3.3.0/bin/mips-linux-gnu-gcc (id GNU, clang 0, GNUC 1)
-- CMAKE_AR:                 /home/ubuntu/mips/mips-gcc540-glibc222-64bit-r3.3.0/bin/mips-linux-gnu-ar
-- CMAKE_RANLIB:             /home/ubuntu/mips/mips-gcc540-glibc222-64bit-r3.3.0/bin/mips-linux-gnu-ranlib
--
-- Configuring done
-- Generating done
-- Build files have been written to: /home/ubuntu/build
Finally, compile the binary:
$ make -j 4
[  1%] Building C object nabto-common/components/nn/CMakeFiles/nn.dir/src/nn/allocator.c.o
[  1%] Building C object 3rdparty/mbedtls/CMakeFiles/3rdparty_mbedtls.dir/mbedtls/library/debug.c.o
[  1%] Building C object nabto-common/components/nn/CMakeFiles/nn.dir/src/nn/endian.c.o
...
[ 98%] Building C object apps/tcp_tunnel_device/CMakeFiles/tcp_tunnel_device.dir/src/device_event_handler.c.o
[ 98%] Building C object apps/tcp_tunnel_device/CMakeFiles/tcp_tunnel_device.dir/src/help.c.o
[100%] Linking C executable tcp_tunnel_device
[100%] Built target tcp_tunnel_device
Confirm the compiled binary seems ok:
$ file apps/tcp_tunnel_device/tcp_tunnel_device
apps/tcp_tunnel_device/tcp_tunnel_device: ELF 32-bit LSB executable, MIPS, MIPS32 rel2 version 1 (SYSV), dynamically linked, interpreter /lib/ld.so.1, for GNU/Linux 2.6.32, not stripped
The resulting executable tcp_tunnel_device must be transferred to the camera. For instance, make it available from a webserver reachable from the camera. Then log on to the camera and retrieve the binary using curl or wget.
Now the tunnel application is ready to be configured and run on the device. First the device must be configured in the Nabto Cloud Console to be able to do remote access.
Create device in the cloud console
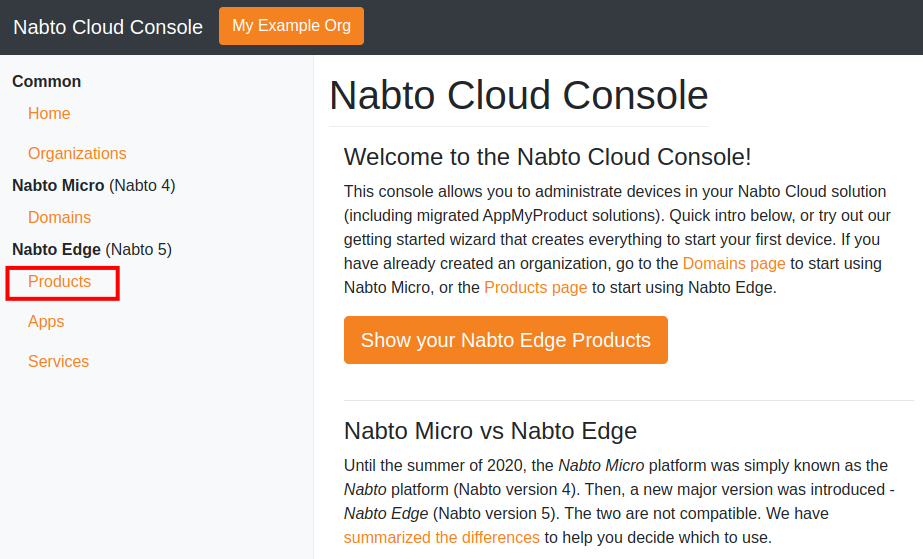
In this step we create and configure a Nabto Edge device. Go to https://console.cloud.nabto.com/ where you can register and log in to the Nabto Cloud Console. Once you have registered and logged on, you will be greeted with the home page. From here click on the Products link in the sidebar.
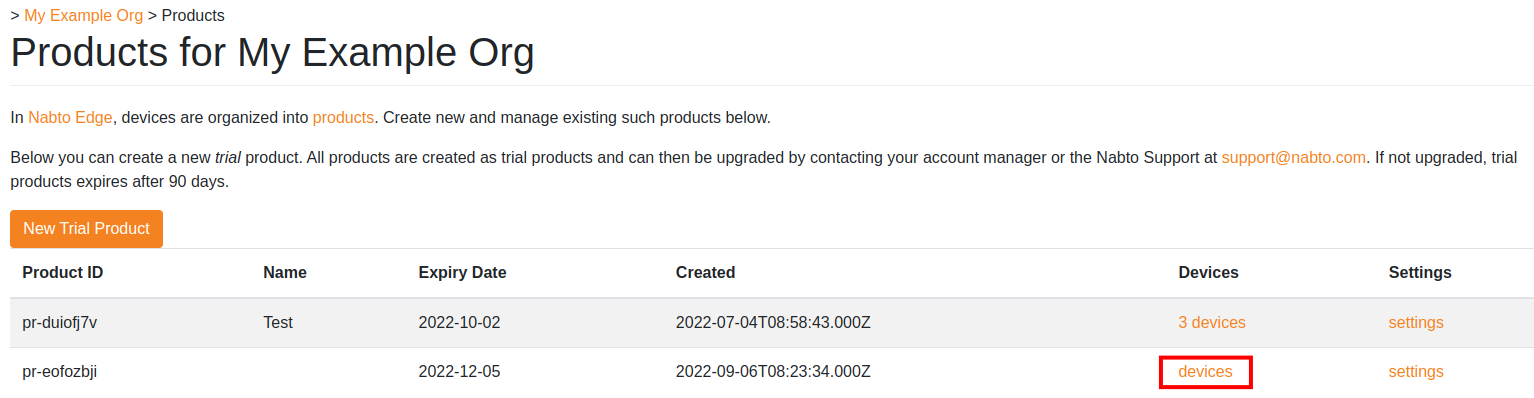
Now press New Trial Product to create a trial product. Creating a product will send you to the settings page for your new product. Return to the products page by clicking Products in the sidebar again. Now you should see that a product has been added to the list. Take note of the Product ID column.
Now we need to create a device. Click on devices on your new product.
At the moment there are no devices registered for this new product.
Press Create Single Device to create a device that we can use. You will notice a new device is immediately added to the list of devices below, and the device has a Device ID column. Click on the device to open its settings.
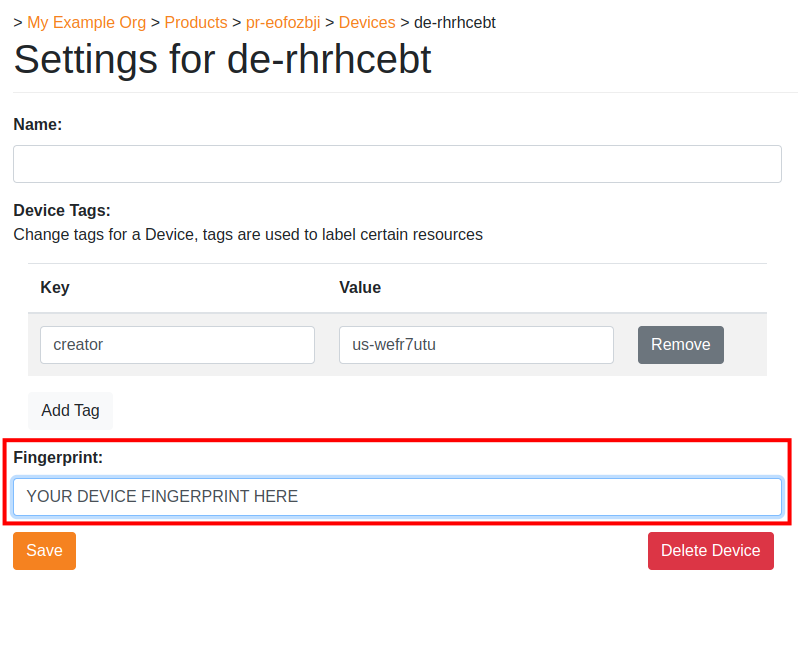
Take note of the Device Configuration section, there will be a JSON snippet containing exactly the information that needs to be in the device.json file of the former section in this tutorial. Do not leave this page yet, we will need to use the Fingerprint section in the next part.
Setup and run the Tunnel Application
Return to where you put the tcp_tunnel_device executable. We have two options for initializing configuration files for the program. First we have the general --init option which gives the most customization. However since we’ll be using a ready-made example app, we can use --demo-init which is a shorter and simpler setup. Let’s run the following command:
./tcp_tunnel_device --demo-init
First it will ask for your product and device ID, you can get these IDs from the Nabto Cloud Console.
Next, the TCP tunnel service is configured. We will just add a single service for this demo - the RTSP service. Recall that we set the port to 8554 and the endpoint to /video, let’s set the RTSP service settings accordingly:
Next step is to add TCP tunnel services.
What type of service do you want to add?
[0]: continue
[1]: ssh
[2]: http
[3]: rtsp
Enter a valid number (default: 1) [0-3]: 3
Enter the port of your RTSP server (default: 8554) [0-65535]: 8554
Enter your RTSP endpoint (default: /video): /video
Added rtsp service on localhost port 8554 with metadata rtsp-path => /video
Note the RTSP endpoint input. TCP tunnel services are allowed to carry some extra information for a client to retrieve when they’re using the tunnel. Think of metadata as simply being a JSON object. The Edge Video application requires a key rtsp-path that will allow it to build a URL to open the RTSP stream. In our case, we have a stream open at rtsp://127.0.0.1:8554/video so the endpoint is /video.
The interactive initialization ends at this point and the executable will print out the following at the end.
The device Fingerprint is: <FINGERPRINT STRING>
Copy the fingerprint string and paste the fingerprint into the Fingerprint input in the settings page in the Nabto Cloud Console. Without this fingerprint, the cloud console will not allow the device to connect, prohibiting remote connections.
Now press save. Ensure that your RTSP stream is open and available, and restart the tcp_tunnel_device executable. It should now print Attached to the basestation after a couple of seconds. Congratulations, your TCP Tunnel device should now be available to use with the Nabto Edge Video client app.
Now the RTSP server can be used from the iOS demo app or the Android demo app - or your own compatible app. With “compatible” means that your app scans the mDNS subtype the tcp_tunnel_device executable uses (tcptunnel). Also, the app must use the RTSP path as configured above in the configuration step on the device. Or you must retrieve that path dynamically from the device, e.g. using CoAP or tunnel metadata.
Viewing the RTSP tunnel video stream
To quickly test the live stream from the camera, you can use Nabto’s RTSP tunnel demo apps for iOS and Android. To learn about developing your own video streaming client, see the Video Streaming guide.
If something is not working, you should check the RTSP tunnel troubleshooting guide.
Specifically if you see the FORBIDDEN error: This error often occurs if you did not use the --demo-init configuration wizard when setting up the tcp_tunnel_device application on the camera: If you used the --init option instead, the default configuration does not allow video streaming for users that were added using open pairing.
In this case, the simplest fix is to start the configuration over using the --demo-init option. Otherwise, the troubleshooting guide describes how to fix a configuration made with --init.